Showing posts with label M is for Make. Show all posts

The back of it {Quilting}

Wednesday, 17 October 2012

With this colour scheme, this quilt can only be one thing - yes it is the back of the Totally Groovy QAL! I actually made an effort with the backing for once because it is supposed to be a quilt for the baby's cot and people may actually see the back of it. Otherwise I usually use one fabric I like ... less. 


In addition to the fabrics you have seen used for the QAL (ie the cross), I used the Universe in Academy from Parson Gray (I love all that collection) - currently on sale at M is for Make (just saying). 


So this weekend, we are attacking the quilting bit - yes you know that bit I keep putting back to a later date. It is time to stop procrastinating and actually doing it and finishing this one off!

Linking up to WIP Wednesday at Freshly Pieced

Nesting {sewing}

Saturday, 11 August 2012

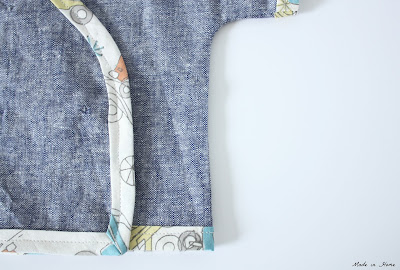
There was a time when Mr MiH was very worried - I was not nesting according to him. He has not read anything much about the changes I was going through, but he was expecting that I would be interested in making things for the baby - all the time. I was not. He is now all relieved, and here is why: the little one's very first kimono. 


I used the (free) pattern from the PurlBee website. It is so easy to follow, the tutorial is full of pictures which works really well for me. The fabric is not new for those following my blog, I showed you on Monday the bias tape I made for the kimono, and the Essex linen is the one I used for my Denim Blue top. All from M is for Make


I changed the places of the snaps. I wanted to make sure it would be secured at the top. 


I was really happy with my choice of thread as it does not how at all (it is hard to see where I had to sew the snaps). The thread is from Coats Duet, colour ref 4520. 


I suppose this little tiny kimono gives you a good idea of what we might be expecting.. 

PS: I am now linking up to Plum and June Blog Hop

Bias Tape Tutorial {sewing}

Monday, 6 August 2012

I seem to have to use bias tape all the time now that I started sewing garment. As Marit mentioned in her comment, you can cut the fabric straight for quilt bindings. This week, it will become clear why I needed a 1/2 inch bias tape. And if you too need some that matches some fabric, here are a few tips that I hope you will find useful. I don't have a bias tape maker - I may be tempted to buy one at some point though.


I am not sure I chose the easiest printed fabric for this, but I wanted this mix of colours. The fabric is from M is for Make, in the Birch Circa 52 collection - called 'cars in cream'. With a fat quarter of the fabric, I made 330 cm of 1/2 inch tape. 

How to make your own bias tape? 

Keep the selvedge edge (on the right hand side), and trim the other sides of the fabric. 


Cut out diagonal strips (at a 45 degree angle) of 2 inches (or four times the width of your bias tape)


Although your first reaction may be to line the edges flush with each other, you should not as I will show you later. You need each strip to overhang a bit and make a 90 degree angle with each other. The strips should end up overhanging about 1/2 inch.  


This is a good example of me getting it wrong with the overhang


That is much better now - and the overhangs are clipped off. 


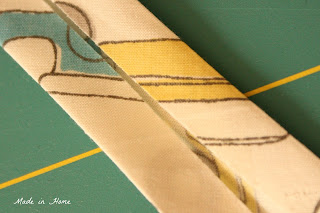
Now here is the point when a bias tape maker would have been quite helpful (as these fiddly steps would not have to be there)! Fold the 2 inches tape in two to make a 1 inch tape. 


Even trickier with the iron, fold the inch sides into two 1/2 inches towards the centre


And here it is a 1/2 inch bias tape.


Hope you found it useful and ready to make your own bias tape!

Denim Blue {sewing}

Thursday, 19 July 2012

I love this top, I have worn it many times already. It is the first one I made during my sewing class back in March, and I am glad I still fit in it (admittedly just). It is easy to wear with jeans for 'dress down Friday' at work, or pack it when we go away. The fabric needs to be ironed really, but the bump provides enough stretching for me to deem this task unnecessary.  


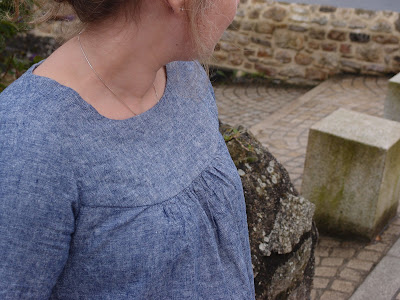
Do you know how difficult it is to take outside pictures at the moment, with this weather? Fortunately we spent Bastille Day/weekend in France last weekend, and in Brittany you can  have sun and rain the same day. When we had a moment to ourselves (both sets of parents were there!) Mr MiH took his new camera and we were off to take pictures. The first one is my favourite! 

So less about photographic prowess, and more about the top construction. So the pattern is from La couture nature by Kyoko Sakauchi, a Japanese sewing book in French. The fabric is from M is for Make. It is part of the Essex Linen line of Robert Kaufman (in denim here). The fabric is perfect for this cold-ish weather. I did it in a size M (I am a size 12 in the UK, 40/42 in France). 


When I had the different pieces for the pattern in front of me, there were two things that were clear: 1) there was a problem with the sleeves (and it was not because of my fat arms); 2) I was going to look quite pregnant (I was not at the time) considering the size of main front and back panels. Note to self, do look at the pieces before you cut out the fabric. I added 2 inches for the sleeves, and I think I left the body as it was, but to be adapted at a later stage. 


The pattern itself is quite easy, there are a lot of pictures included like in any other Japanese sewing book - really useful when it came to the gathering of the front and the back panels. Quite an interesting process in the end. The pattern calls for some Vilene to stabilise the top, but I found in the past that the fabric became too stiff. I used some very light weight cotton voile interlining/facing in John Lewis (more expensive but it adds fluidity to the top). 


All in all quite a success, not sure I would have made it without the help of my sewing class. But I think it is probably a case of trying to make these tops or other patterns in the book and learning the process. I am still quite new at sewing garment for myself. But it is sometimes so much quicker than knitting! 


Shame this top will soon be relegated to my pre-pregnancy clothes pile!