Showing posts with label bias tape. Show all posts

Highbury + Islington Baby Quilt | A finish {Quilting}

Friday, 25 July 2014


I am so happy this quilt is finished. I talked about the WIP process there - this is for my friend who had a little boy a bit of time ago now (shame on me!). You would have thought that this one was going to be finished within days, but oh no... it took me months to get there. Of course, the top quilt was really easy to sew together (I talked about my choice of fabrics here). 


But when I decided to go for a dense quilting, well who knows what I was thinking - it took forever, and although I like it, I wished now that I had done it in a colour similar to the bias tape I used, instead of white. I think I am more a hand-quilting sort of a girl - it usually works well with quilts that I have a modern feel to them. 


I am really pleased the bias tape I found at Ma Petite Mercerie in ochre. I mentioned in my first post that I was considering gold, and I had the right idea - it really pops and makes it really summery.  I finally spent some time finding out how to put a bias tape properly - and here is the tutorial that actually made sense for me. 


And it works beautifully with the back fabric. I am very pleased it is finished, but also with the actual quilt. I hope my friend will be too, and that she will be able to keep it for a little boy for a bit of time. 

Some quilt stats
Measurements: 140 cm x 105 cm
Pattern: my own - for a baby boy
Fabric: Happy Drawing Elephants; Free as bird | Pollen, Up, Up and Away; Botanics: Graph Paper Garden in blue
Backing: Koi - Smile and Wave in Reed
Binding: Bias tape in ochre from Ma Petite Mercerie


Nesting {sewing}

Saturday, 11 August 2012

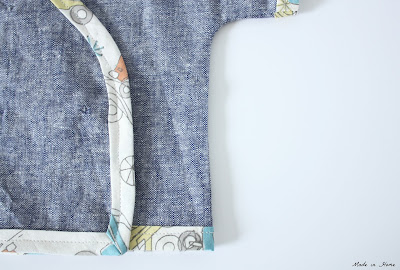
There was a time when Mr MiH was very worried - I was not nesting according to him. He has not read anything much about the changes I was going through, but he was expecting that I would be interested in making things for the baby - all the time. I was not. He is now all relieved, and here is why: the little one's very first kimono. 


I used the (free) pattern from the PurlBee website. It is so easy to follow, the tutorial is full of pictures which works really well for me. The fabric is not new for those following my blog, I showed you on Monday the bias tape I made for the kimono, and the Essex linen is the one I used for my Denim Blue top. All from M is for Make


I changed the places of the snaps. I wanted to make sure it would be secured at the top. 


I was really happy with my choice of thread as it does not how at all (it is hard to see where I had to sew the snaps). The thread is from Coats Duet, colour ref 4520. 


I suppose this little tiny kimono gives you a good idea of what we might be expecting.. 

PS: I am now linking up to Plum and June Blog Hop

Preparations

Wednesday, 8 August 2012

It is Wednesday and I think I am getting the hang of WIP Wednesday and trying to schedule my new projects accordingly. We are off on holiday soon, and that only means one thing, I need to get ready, so ... 

I clearly need a new passport wallet


Mr MiH has his very own, but tends to carry my wallet as well - and I am assuming this will mean the baby's one in the future.So the fabric choice needed to be 'manly', Mr MiH would refuse to carry the passports otherwise - and he is providing a valuable service (i.e. it is not my fault if we lose them, and he runs much faster than me if there is a problem). 

I bought the pattern at One Shabby Chick's Etsy store, after seeing Kelly's one. You can see my choice of fabric on the left hand-side corner of the picture. It is all cut and I am ready to start with the instructions, loads of pictures so should be straight forward. I am making the 4 passport wallet, although with the baby we are going to end up with 5 passports in the household - I am the single-passported member of the family - feeling slightly 'under-passported'. 

Next is a beach/swimming pool bag. There will be a swimming pool where we are staying, and there are beaches as well. I found the reversible bag pattern yesterday (free pattern), cut it out last night. And I have already made some modifications - it will be bigger and bi-coloured on the outside, and in linen fabrics. Looks fairly easy on paper...  


I obviously need a holiday project, and you will be glad to know I am knitting again! It took a bit of time to recover from Winnowing, but now I am back swatching away for a cardigan, and trying to find the right colour and gauge.. 


It is not just about WIPs, I finished a little project using my bias tape, I just need a couple of things to really finish it off - so hopefully that will be over and done with this weekend, but here is a sneak peak at it. I love this bias tape..


Go and check out all the other Wednesday WIPs over at Freshly Pieced

Bias Tape Tutorial {sewing}

Monday, 6 August 2012

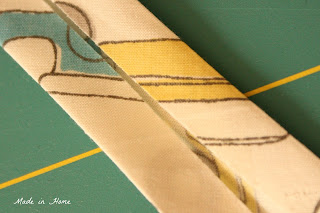
I seem to have to use bias tape all the time now that I started sewing garment. As Marit mentioned in her comment, you can cut the fabric straight for quilt bindings. This week, it will become clear why I needed a 1/2 inch bias tape. And if you too need some that matches some fabric, here are a few tips that I hope you will find useful. I don't have a bias tape maker - I may be tempted to buy one at some point though.


I am not sure I chose the easiest printed fabric for this, but I wanted this mix of colours. The fabric is from M is for Make, in the Birch Circa 52 collection - called 'cars in cream'. With a fat quarter of the fabric, I made 330 cm of 1/2 inch tape. 

How to make your own bias tape? 

Keep the selvedge edge (on the right hand side), and trim the other sides of the fabric. 


Cut out diagonal strips (at a 45 degree angle) of 2 inches (or four times the width of your bias tape)


Although your first reaction may be to line the edges flush with each other, you should not as I will show you later. You need each strip to overhang a bit and make a 90 degree angle with each other. The strips should end up overhanging about 1/2 inch.  


This is a good example of me getting it wrong with the overhang


That is much better now - and the overhangs are clipped off. 


Now here is the point when a bias tape maker would have been quite helpful (as these fiddly steps would not have to be there)! Fold the 2 inches tape in two to make a 1 inch tape. 


Even trickier with the iron, fold the inch sides into two 1/2 inches towards the centre


And here it is a 1/2 inch bias tape.


Hope you found it useful and ready to make your own bias tape!