Showing posts with label naturally dyeing. Show all posts

Friday Randomly Sharing

Friday, 23 October 2015

Happy Friday everyone! Welcome to FRS where I share what has caught my eye recently - but where you could also share what has interested you - so please make full use of the comment box!


- I have finally managed to naturally dye some organic cotton I had in my stash - I used Rebecca's dyeing with avocado skins tutorial. It takes a while, but totally worth the effort. I am not sure what I will make out of my new fabric, but whatever it will be I cannot wait to wear it with my new hand-knitted cardigan

- Pauline released her new pattern - the Rosari skirt - I love how she is always bang on trend. I want a jeans version of this skirt - and in fact I already have the fabric in my stash for it. Maybe I will even wear a skirt, and not just make one for my wardrobe. That would be quite something. 

- I discovered Clemence - or Huguette Paillettes on instagram - she posts free tutorials/patterns. It seems that the Germaine Cardigan will become a French blogger must have. It is a free pattern, so I may have a go. 

- I may just have to read this book about courage and the next steps. I may not be ready for any of this yet, but hopefully in time I will. 

- Liesl is going to do a shop update on  October 30, and the natural colour she produced out of walnuts is unbelievable.

- The versions of the Mesa quilt makes me want Quilting from every angle even more. I love Nancy's style. It may get me back into quilting as well. Has anyone got the book? 

- Grainline Studio and the Tamarack jacket - I have wanted to make a jeans quilted jacket for a while. It might be it (with a few modifications here and there). Love that it is collarless!

- Erin sewed a top called Natalie- well I just had to check it out - how fun would it be to sew a top with my name on it. It is a bit too similar to the  Weekend Gateaway blouse - that I should have finished by now but is not. Still a nice top with a great name!

- I love the Aoraki hat - I have not bought the pattern yet, but for sure I will knit myself one this year - probably in that colour with that pompom - OMG, have you seen the pompom? 

Natural Shades of Pink :: Dyeing Fabric with Avocado Skins with Rebecca Desnos

Saturday, 12 September 2015

I am really excited about this tutorial as I have been wanting to dye with avocado skins for a long time - and Rebecca's step by step tutorial is making it easy for me (and you) to try . I dyed naturally yarn in the past – but my results (and process) are so random that I have not tried again. But now that the key ingredient to this tutorial is something I eat a lot of is brilliant, so it should be quick (and easy) to get enough dyestuff!


If you use her tutorial, please let us know and share your makes! 


My name is Rebecca Desnos and I'm a natural dyer who works exclusively with plant dyes and plant fibres. I'm vegan so I don't use any animal fibres such as wool or silk, or animal-derived dyes such as cochineal.

Several years ago I began dyeing with plant extracts such as madder, which produce beautiful and reliable colours, but I discovered that it's much more exciting and rewarding to make my own dyes from scratch.

Avocado skin dye is my current favourite dye and I've always got a jar of dye in the fridge ready to use. The colour is so pretty and I'm always finding new things to put in the dye pot. I think it helps that avocados are one of my favourite foods, so I manage to save up the skins quickly!

I have an Etsy shop with a selection of plant dyed scarves, bags, cushions covers and wooden beads.


This is just my own method of dyeing with avocado skins, but it’s not the only way to do it. It’s through experimentation that you will find what works well for you and you might find an even better way of doing things. For example, how about using rainwater instead of tap water? Try a different type of saucepan to see if that affects the colour. The possibilities are truly endless.


To prepare the fabric for dyeing:

These instructions are for dyeing cellulose (plant) fibres, such as cotton, linen or bamboo.


1. Prewash fabric in the washing machine in a natural laundry liquid (I use ECOS Earth Friendly laundry liquid). Either allow to air dry or go onto next step.
2. Pour a litre of unsweetened soya milk into a bucket and dilute with water. I usually do roughly 1:1 ratio of water to milk. Drop fabric into the bucket of watered down milk and stir. Leave to soak overnight, stirring it a couple of times before going to bed.
3. In the morning, lift out the fabric and squeeze out as much of the soya milk as possible, then put on a spin cycle in the washing machine.
4. Leave to air dry.
5. Drop the fabric back into the bucket of milk for a quick dip. The aim is to coat the fabric evenly with soya milk, without removing the previous dried on layer. If the fabric sits in there too long, the first layer of soya may rinse off.
6. Squeeze as much milk out of the fabric as possible and put on another spin in the washing machine and then leave to air dry.
7. Do a final quick dip in the soya milk, then squeeze out as much milk as possible hang up to drip dry. Depending on the weather, this final stage can be a bit smelly, so it’s best to dry outside if possible.
8. Once the fabric is completely dry, place it in a plastic bag and store it for at least a week before using.


Note: This soya milk method is not my own, and I first read about it in India Flint’sbook ‘ Eco Colour’. The idea is that the protein in the milk coats the cellulose fibres and makes them more protein-like, increasing the absorption of the plant dye. From my own tests I’ve found that this method really does help achieve darker shades.

To prepare the avocado skin dye bath:

I collect avocado skins over the course of a few weeks. I scrape and rinse the skins then place them in a bag in the freezer. I’ve only dyed with hass avocados as these are the only ones available in my local shops, but I’m sure that other varieties produce equally beautiful shades.


1. Weigh the dry fabric and use at least this weight of avocado skins. The higher the ratio of avocado skins to fabric, the more concentrated the dye, and therefore the deeper the colour. I often use 2:1 ratio of avocado skins to fabric to get a really deep colour.
2. Place the avocado skins in an aluminium saucepan and cover with tap water so that all skins are submerged. 
3. Heat for at least an hour and stir from time to time. The skins will soften and break down.
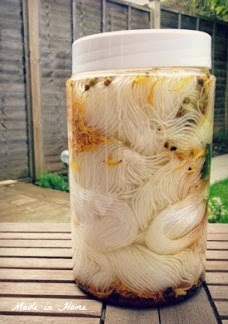
4. Leave to cool, then strain the mixture through a sieve lined with a fine cloth such as muslin. The colour of the water should be a deep red. Squeeze the pulp in the cloth to extract as much of the concentrated colour as possible.
5. The dye is now ready to use. If you’re not ready to use straight away, it can be stored in the fridge.


Dyeing the fabric:

Decide how you will dye your fabric. Will you dye it an even shade? If so, you may need to add extra water to the dye pot so the fabric can move about freely. Will you fold up and tie the fabric to create patterns?


1. Drop the fabric into the aluminium saucepan (reserved just for dyeing) and add extra water to make sure all the fabric is submerged and can about move freely. 

2. Heat the saucepan for at least an hour and allow the dye bath to simmer, ensuring the fabric is always submerged. Stir from time to time with a wooden spoon (never to be used again for cooking!) and keep a close eye on it to make sure that it doesn’t boil.
3. Leave the fabric to cool in the dyebath over night. 
4. Further heating may deepen the shade, but may not be necessary if you already have a deep shade. 
5. Take the fabric out of the dyebath and squeeze out as much liquid as possible and leave to drip dry.
6. Once the fabric is dry, it’s best to be patient and let the fabric sit for at least a week (the longer the better) before rinsing. This should help with the fastness of the dye.
7. Once I’ve rinsed the fabric, I usually put it on a short wash cycle in the washing machine, then let the fabric dry naturally. Then it’s ready to use for whatever you’d like!


Note on light and wash fastness:

According to my own tests, the colour lasts well using this soya milk method, but it is dependent on so many variables, so you would need to do your own tests to see how fast your colour is.
Please bear in mind that all dyes, even synthetic ones, will fade in bright sunlight, so it’s important to treat dyed fabric with care. I always store naturally dyed scarves in a cupboard to avoid fading. I also avoid washing naturally dyed fabrics too frequently and will often air out a scarf rather than washing, to help preserve the colour.
I’ve found that avocado skin dye fixed with this soya milk method to fair well in light fastness tests (actually better than some other dyes fixed with chemical mordants!) and it actually yellows if it’s exposed to sunlight, rather than fades.

Thanks Rebecca for this amazing tutorial, please share your makes with me and Rebecca, she is on IG and twitter @rebeccadesnos! 


Shades of brown :: Naturally dyed yarn ::

Tuesday, 31 March 2015


This is my third attempt at naturally dyeing yarn - I used old fustic this time. I did not use the solar method, but went the really (really) long way about it - making a dye bath, using a mordant separately, and dye the skeins The difference between the two skeins is the mordant.

I was really hoping to take proper notes to be able to replicate the process. However this is not possible at the moment - babies waking up when you are about to start the dyeing, or feeding time happens when you need to need to stop the mordant bath. I reckon the solar method is better suited for my life - because I can leave it as long as I want and it will be fine. 


Nevertheless I am really pleased with the result. I think the lighter skein may become socks, I am unsure about the brown skein, maybe a beanie hat, to leave me time to think about it. 

I bought all that I needed from wild colours in the UK. 

Has anyone dyed yarn with fustic, what were your results? I am not sure I should have really ended up with the brown one. I love how naturally dyeing is so unpredictable. However my aim is to make all this process more predictable - but the way I am going about it, it will take a loooooonnngg time! I am really in awe of the dyers out there who can dye several skeins the same colour using natural elements. 

Autumn Leaves | A finish {Knitting}

Saturday, 25 October 2014


If you follow me on IG you know that I actually finished Slable  a week ago - and that the pictures were taken on our weekend away in Norfolk (the last one as a family of 3!). It was all scheduled that way - I was hoping to snap some autumnal scenes as well as the beanie hat - because that colour kept reminding me of Autumn leaves. Not that I knew what to expect when I started with the natural dyeing kit - and in fact I had no idea what the result would look like, but it totally exceeded my expectations. 


I did not change anything to the beanie hat pattern - this is my second beanie hat from Twisted Woolly Toppers (I made Acorn for Baby MiH - one of my favourites). I wanted something with texture yet simple that would show off the yarn colour. The combination of moss stitch and cables certainly did that. I think a real revelation of the pattern was the cast on method used - the alternative cable cast on. Woolly Wormhead did a great tutorial here, so you could use it for your future beanie hats too (it may work better for thinner yarn though). 


Pattern: Slable by Woolly Wormhead (available here)
Yarn: Hand dyed fingering weight yarn (naturally dyed in fact) - by me. 
I talked about the kit I used here
Needles: as recommended by the pattern
Size: Size 2
Modifications: None
Result: I love how it shows the variegated yarn and also the intricate cable work. 
It is slouchier - slouchier than I expected. 


As you can see it is really hard to capture the actual colour of the yarn - but hopefully between the leaves and mushrooms and the different snaps - you get the general idea. 

All I can say is that if you are thinking of trying natural dyeing - do it, I don't think you will regret it. I like it so much that in fact I have another yarn being dyed as we speak. I have not found a project for it yet, so I am leaving it to be. 

Natural Dyeing | The Result

Wednesday, 17 September 2014

I think I am a convert to natural dyeing. I did not know what to expect when I started or during the process for that matter. But I am in love with the result. Look at the shades of yellow and brown throughout the yarn, it is subtle but will add a lot of interest. 


I am not going to lie, it was not the easiest process to wash away all the natural dyes stuff I used, and even though I tied the skein together it was not as easy to put it around my yarn winder (I should have tied it in more places) - but I only had to cut the yarn in one place, that's not bad going. But clearly a few things to think about for the next time, because there will be a next time

I am now knitting this - yes I have many WIPs already, but I could not resist, I just had to know what it looked like knitted! This is the beanie hat pattern I have chosen, expect a finish soon (or not as I am knitting in 3 mm, not my most favourite size). 

To see all the other WIPs, head to Ginny's yarn along

I got my kit from Spin City UK if you too are interested in trying it out. 


The WIP before the WIP | Natural Dyeing

Wednesday, 3 September 2014

*For a chance to win one yard of organic cotton fabric dyed naturally
please make sure you enter the giveaway here*

Natural dyeing is something I have been wanting to try for a bit of time, but I had no idea how/where to start - and what was required of me. I have dyed wool (quite successfully) before, but not using natural dyes. As my readers will know I am totally committed to find organic and naturally dyed craft supplies - and of course one way to do this is actually do it myself. Easy to say... harder to put into practice. 

I have been really impressed (jealous?) by Liesl who has had amazing results with natural dyeing, but every time I was wondering how I would manage to do this without Baby MiH going straight into the dye bucket, and in fact how to find enough of the natural dyes.  


 So when I found a natural dye kit on Etsy (from a British Etsy seller as well), I jumped at the opportunity to try natural dyeing without too much effort on my part. The kit contains the plastic jar (reusable) that you can see, the mordant, three natural dyes and the yarn (an organic merino blend sock yarn, around 400 yards of it). 


I chose a brown/yellow dye kit as with the Autumn coming, these will be the colours I am going to be drawn to most probably and want to knit. Also I figured that it should go with any pattern I chose to knit - I am wondering if it will be my first pair of socks or maybe a beanie hat and mittens...  


I opened the kit last Friday, and I know there are a few pictures here, but it took probably only half an hour to make it all - the longest part being to separate the skein into two equal parts to (hopefully) get a variegated effect. 


And this is the colour I am seeing at the moment, the bottom is definitely more brown - so it should be interesting to see how it comes out. And this is one big lesson about natural dyeing, I have actually no idea how it will come out - I know the general colour scheme but not how it is actually going to look like once knitted. 

On the instructions you are advised to leave the dye to work for at least 2 weeks - but I am already desperate to just open the pot and see how it is. However I do have a lot of WIPs going on and I have decided that I will leave the jar to rest until I have the capacity to start a new knitting project (so that is probably in 4 projects' time) - and who knows how the colour will be then. How exciting!  I can see why it is so difficult to find companies that do natural dyeing on a larger scale though. 


To help me through the process of naturally dyeing, and try to have more certainty about what is going I have bought Wild Colour by Jenny Dean. At the moment I am using it as an inspiration guide, and have not gone out to actually find the natural dyes. But I am really excited about this part as well. 


It will be fun to try to identify the plants in the wild and experiment with the flower, leaves and stems. 

I know some of you have already tried naturally dyeing, how did you find the process? Will you try again? 

Linking up to Ginny's today