Showing posts with label kona solids. Show all posts

Geometrics | A Finish {Quilting}

Friday, 4 July 2014

Last week I talked about my inspiration for new cushion covers, and also the colour schemes I was considerng. In the end I could not choose, and made two covers in each of the colour scheme - a bit his and hers, but hopefully not too much. I managed to clear some fabric, and I love them! Also it was an opportunity to use some paper piecing - a technique I don't use that much but should because I really like the result you get.


Of course, one is cover is very close to the inspiration colour scheme, so I knew I would like it, but to see it for real is even better. It is really my style, but also really summery and I don't have so many things that bring summer instantly in the house. 


I am not sure whether this is the easiest way to do it, but I used the paper piecing method - I think the result is quite neat, especially for the middle colour.


It took me an hour to make one cover, because this method saved me some time by not having to cut the pieces to size and pattern. To make the cover, I added another background layer of cream fabric, because of the destash the quality of the fabrics were not consistent and I wanted to make sure that it did not show at the back.


The fabrics in block colours are probably from Kona Solids (or you can find equivalent in the Kona range), the blue stripey one is Leah Duncan that I had already used here and here (I don't think you can find her Maya range anymore, so I am using my remaining bit of fabrics carefully!).


In the second cushion cover, the stripey fabric is from a shirt I used to wear (well in fact it used to be my Mum's) - so I also managed some upcycling.


I am happy with both colour schemes, not sure which one I like best, the covers are so different. If you would like the measurements I used, get in touch I can send you the file I made. 

If all my destashing projects go like this one, this is going to be really fun!

Happy 4th July to the American bloggers, I hope you are all having a great day!

Linking up to TGIFF over at Quokka Quilts and Crazy Mom Quilts

The BookClutch | Tutorial {Quilting}

Tuesday, 29 October 2013


Welcome again, here is the second part of the book clutch tutorial, the covering of the box to make it book-like! For those who followed the first part, you will be glad to know that this part is much easier, and faster. But you still have to pay attention to the matching of the orange and cream sections. 

For this part of the tutorial, you will need 

  • - a wooden box roughly the size of a book
  • - Kona solids fabric in orange and cream
  • - Craft PVA

So you have your book cover done, the next step is to make the sides of the box. Of course, the measurements depend on your box. In terms of width, I fold the panels in two (just by ironing them) so you have to take this into account in your measurements. 

I decided to show each 'corner' of the book by separating the top side, the opening covering and the bottom side covering, You don't have to do this. 


1. Top side including fabric to cover some of the spine;
2. Opening side that need to match the book cover;
3. Bottom side including fabric to cover some of the spine

Similar quilting line on cream section to match the book cover
And this is what you are aiming to get. The fold will be on the side of the box opening. 


You have to match the corners of your box with the different sections you sewed, and your are ready to glue in place. 


Trim the excess fabric at the top so that the book cover lays flat on the box. You may need to leave the box open to make sure you don't glue it shut... 


Wait until the glue is dry, and glue the book cover. And that is it... just really a lot of glueing in place so you don't have unnecessary and awkward stitching everywhere. 

All you need to do now is wait for your fashion blogger friend to style it! 

I hope the tutorial is clear enough or that at least there are enough pictures for you to understand the process I used to make the book clutch. It is time consuming, especially the book cover, but you get a truly unique item in your wardrobe! Again, do not hesitate to contact me if you would like me to make you one. 

If you do make your own, please please let me know and show me pictures! 

Follow on Bloglovin

The Bookclutch Cover | Tutorial {Quilting}

Monday, 28 October 2013


Here it is – the book clutch tutorial (well a written version of how I made it)! I decided to ‘write’ it in two parts – the making of the book clutch cover and then the covering of the box. I am not one to write a lot in tutorials – so there will be a lot of pictures and a few words and tips along the way.

You will need:
  • -          Kona solids fabric in orange and cream
  • -          Black Felt
  • -          Iron-on adhesive like Heat’n’Bond
  • -          Backing fabric (it will not be seen so whatever you have)
  • -          Batting
  • -          Embroidery thread in black and orange
  • -          Quilting thread in cream
  • -          All the materials for printing on fabric (tutorial here)

-      I would strongly recommend that you get a vintage penguin book (I scan bits of it, unless you can find an online picture you are happy with).


The dimensions of the whole cover are dependent on the size of your box. The finished dimensions should be width of the box, and the length of the box + 1cm (to take into account the covering of the spine with the batting.

For my box, I needed a cover of 16cm wide and 28cm long.

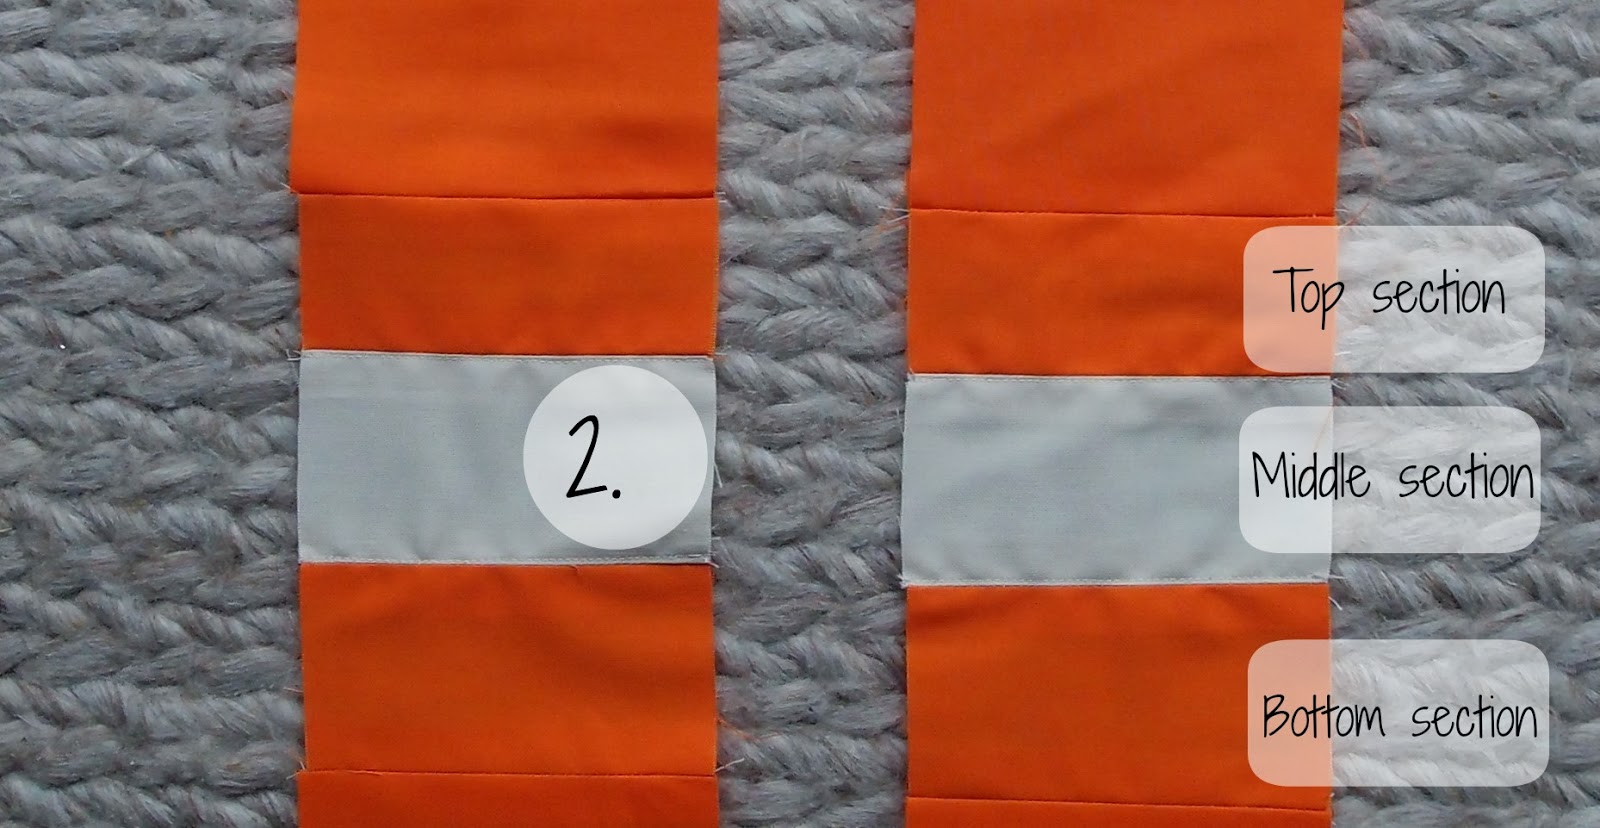
The cover follows the proportions of a penguin book – top orange section is 5.4 cm , middle cream section 6.9 cm, bottom orange section is 5.7 cm. I ended up with: my finished top orange section is 4.8 cm, my finished middle cream section 6.1 cm and my finished bottom orange section is 5.2 cm. 

You are all still with me?

Let’s talk about seam allowances. I like to have quite a bit, so usually 1cm – you decide. However for the top and bottom edges and side edges you will need to be able to ‘cover’ the batting to make it like a book cover, I left 2.5cm (but I would leave more next time). So the unfinished cover should be 21cm wide and 33cm long.

So we know what we are aiming at… Now about the details…

You will have to start to print on fabric using my tutorial here. The cream part includes the title and the author at the front, and the title on the spine (based on a penguin book).


To position the title, I printed the cutting line of the cream section including the seam allowances. Also you have to measure the front and the width of the box to section the length of the cream fabric. I have done all of this in a word document.  

You don’t have to follow this step – I just find it much easier to do the embroidery with a template especially to place it, and you can tinker a lot with the word document before it is set.


On the bottom orange section, I added ‘Complete Unabridged’ and on the top orange section: the author on the spine. Again you need to place the writing so that the penguin will fit and that it is still central.

Et Voilà!


You may have noticed that the dimensions (length wise) of the sections you need to print are bigger than a A4 sheet. However only half of the section needs to be printed on, I pulled through the rest of the fabric, just be careful not to tear your fabric.

Have you made it to here? Great, let’s add more details then.

The ‘Penguin Book’ top logo and the penguins are based on scans of the penguin book I have. I printed the specific parts on fabric and ironed on black felt using Heat 'n Bond.


The logo is ironed on the heat’n’bond, then cut out and then ironed on black felt.


You cut out outside so that you can see the felt framing the logo.


And you get to do the same with the penguins. The little one for the spine is really hard to make – just warning you, you could just skip it…


You sew the three sections together and add the logos onto the cover (more heat’n’bond and some stitching).

It is starting to look very much like a Penguin book right?! It is time to add the handmade look!

You need to add the batting and the backing fabric to add some texture to your embroidery.


I did some machine embroidery (around the ‘penguin books’ logo and the penguins) and hand embroidery (everything else). I used different stitches to make sure that the writing could still be read but that it covered the printing. I also added the bar between the title and the author on the front cover.

And fold the seam allowance around the batting to make it a cover.

Nearly there….

I added my label… Whoohoo!


 And you are finished!


Easy right?! Tomorrow I will show you how to cover the sides of the boxes and put together the book clutch! I hope you enjoyed the tutorial and will have a go at making your own. 

If you don’t feel like making one for yourself, don't hesitate to contact me, I would love to make your own unique version!
Follow on Bloglovin

The Book Clutch | Tutorial announced {Quilting}

Friday, 25 October 2013


The book clutch has been finished, sent and received (more great pictures on Caterina's blog)! I will be sharing with you some of the process next week on the blog. 

I decided to write this tutorial in two parts - how to make the cover and the covering of the box (you could make a plain or even fancier version of the clutch!). So who's up for it? 

Printing on Fabric {Tutorial}

Tuesday, 25 June 2013

This is so much easier than what I had in mind. I am not sure why I thought it would be really time consuming as I have never really researched how to do it. Until my latest collaborative project - it will involve printing on fabric - and I am SO happy I bothered looking into it. It is easy, and fun - and you get to totally customise your work!


This is a quick tutorial - the pictures tell it all really. What you need is:

  • A Bubble Jet Set 2000 solution (I bought mine in the UK at Rainbow Silks)
  • Some freezer paper (bought also at Rainbow Silks)
  • A printer
  • And some fabric (I used some Kona Bone and Flame)


Leave the fabric in the Bubble Jet Set 2000 solution for 5 minutes

Let it dry

Iron it on some freezer paper (on the shiny side)

Feed into your printer (hoping yours is less dusty than mine)

Here we are

Have to take into consideration to carefully remove the paper

Playing around with my new printed fabric
Easy right! Now the options are endless, expect a lot of printing my own fabric from now on!
Follow on Bloglovin

Happy Feet!!

Friday, 12 April 2013

I went through different names for this little cheeky penguin (Gege le Pengouin was a close second), but the back made me think of Happy Feet! It is a finish, whoohoo! 

You may have noticed that I made a new paper piecing penguin since introducing him to you a couple of weeks ago. The fabric for his torso (do penguins have torsos?) has now writing on it, to go with the ones on the back of the cushion. Matching alert everyone, I am actually caring about the back as well as the front of my project now! 

I did some embroidery for the eyes - very therapeutic actually. And you will have noted that I may be the only person that can mess up a paper piecing pattern, and there is a little black triangle that should not be there (a bit like an added third ear). Don't ask me how I managed it, I really don't know. 


I kept it really simple at the front - to make sure the penguin strip would stand out. I may add some snowflakes quilting later - but not sure yet. I top-stitched the white bands of fabric. 


For once I am very happy to show you the back of my work. I saw this fabric first on Don't Call me Betsy - and I just had to get it. It is so perfect, the penguins are so cool! I used the Sew Mama Sew tutorial for the zipper, and it is amazingly simple! Why no one told me before - than you Jess for showing me the light!


Here are more details about the cushion:

- Paper Piecing pattern from Pretty in Patchwork: Holidays (the correct version of the pattern here)
- Blue background fabric for the penguin is Leah Duncan Maya fabric (also used for Baby MiH's moses basket)
- Penguin torso fabric is Mon Amie in white found at Plush Addict (UK based)
- Kona solids for the rest (can be found at Simply Solids, UK based)
- Back fabric is Circus - Penguins on Blue by Nancy Wolff found at Plush Addict 
- The flap fabric was in my stash (I think I got it from Stefanie Style Etsy shop)
- Embroidery floss from DMC. 


This is one cute little fellow for Baby MiH's cot! I am quite pleased with my first paper piecing finish! 

PS: Did you read the Susan's post on Le Challenge, she has also got an amazing giveaway - you can enter here! Only a couple of days left to finish your entry! 

Follow on Bloglovin