Showing posts with label baking. Show all posts

Friday Randomly Sharing

Friday, 18 September 2015

Happy Friday everyone! Welcome to FRS where I share what has caught my eye recently - but where you could also share what was interest to you - so please make full use of the comment box!

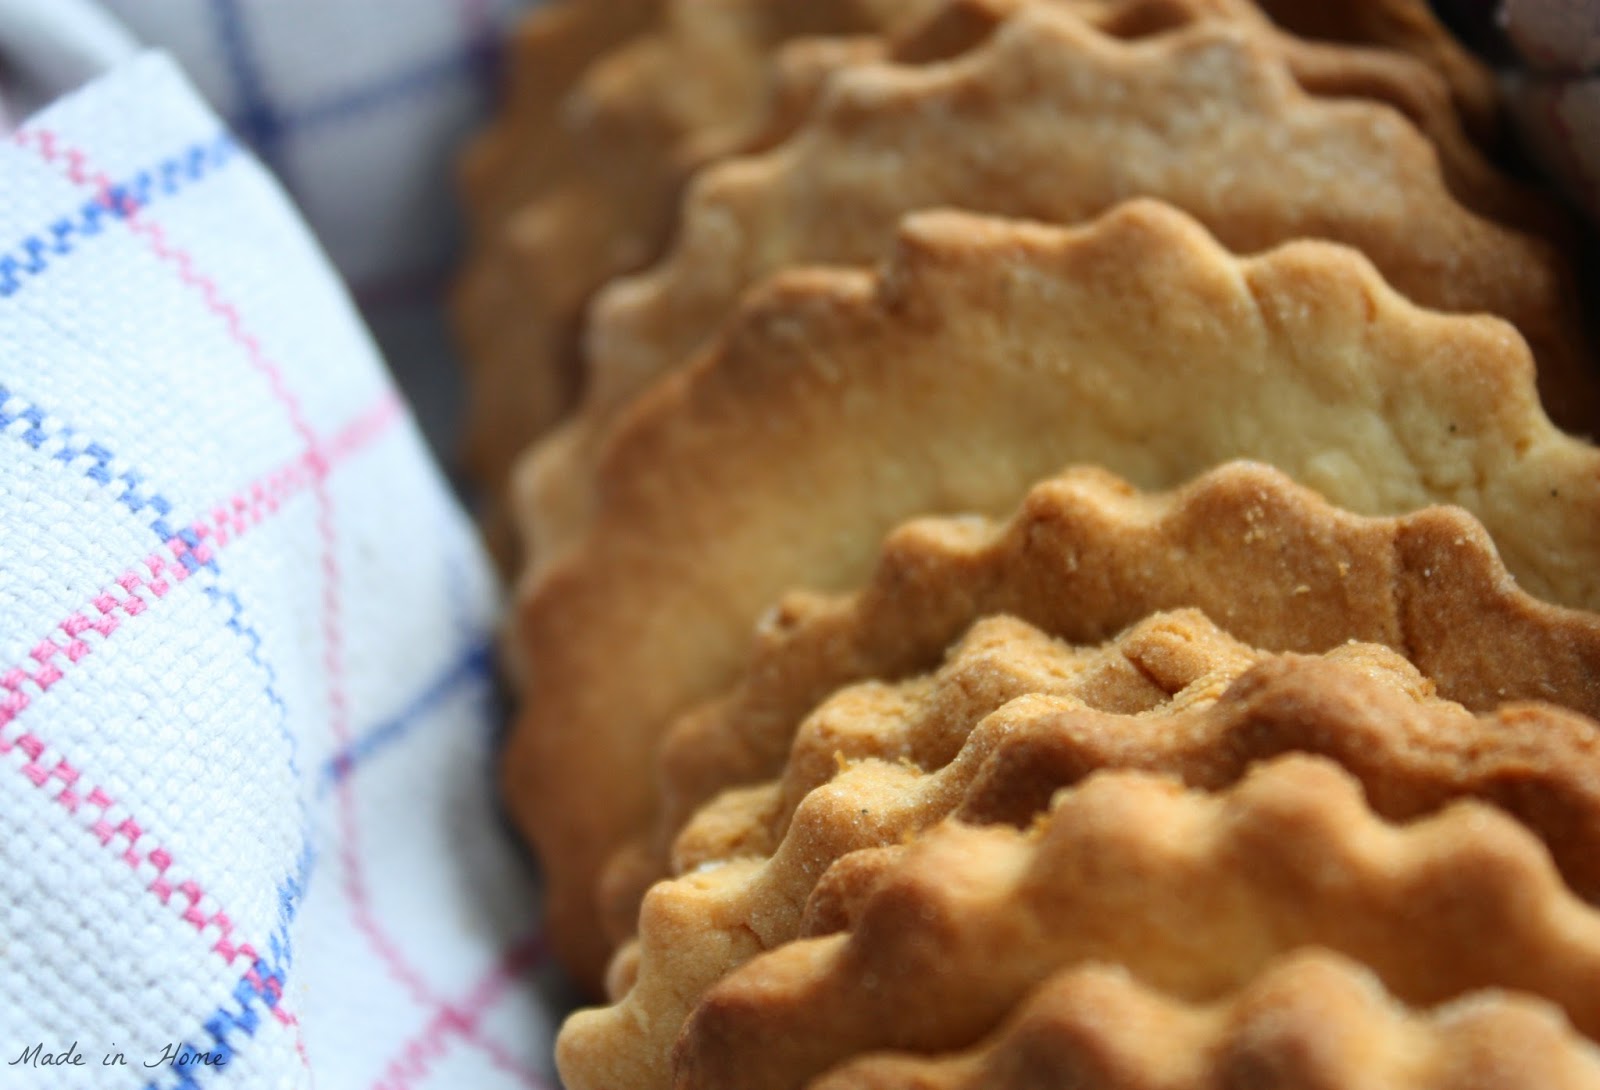
- Let's start by some baking - a nutella cake, sounds good, right?! I saw this post from earlier this month (I caught up a bit with posts this week), and I just knew I had to try it just because it looked beautiful (and yes, it got me started thinking about Xmas, and we know how much I love Xmas!). It looks ok for a first attempt, but the dough is too bread like at the moment, and I think I need a brioche type of dough. I have not found a recipe I like yet, so still on the look out if anyone has any to share? 


- This week, Brooklyn Tweed published it Fall 2015 pattern collection. As always it is worth checking it out just for the photography - how beautiful! I am head over heels about this collection but I do have a favourite, the Bannock cardigan. It is also featured in a beautiful plum colourway, absolutely gorgeous. This collection also features the new BT yarn - quarry - very exciting stuff!

- Talking about new yarn, de Rerum Natura, the ethical yarn from France I talked about here, has also launched new yarns - Albertine (a fingering weight yarn) and Penelope (DK weight). I will have to plan a new project - as if I did not have enough WIPs already. 

- And maybe this new project could be the Farmhouse shawl (by Cabinfour). I have seen many versions of this shawl, and Liesl version is beautiful (and her pictures), and reminded me how much I loved this simple pattern. 

- Fringe Association is organising a tag along in October called Slow fashion October, I will try to join in, will you? 

- An epic knitting project by Kessa in stitches - a knitted lace wedding dress. I won't say more, you have to see it for yourself, it is truly unbelievable. 

- Blanket capes are in (again) this season, check out this DIY to make your own! 
 
- New on my playlist is I can't Feel my Face by The Weeknd - makes me so happy. 

- And well, as I am in the England, I have to remind you (or do I have to?) that today is the start of the Rugby World Cup! Check out Matt Dawson's hakarena video. It is quite funny, but then again I don't support the All Blacks. Allez les Bleus! 


Almond and Chocolate Madeleines :: Baking ::

Friday, 17 April 2015


Baby MiH received a lot of chocolates for Easter - from grand-parents, nursery... He does like chocolate, but there is so much one little boy can (should?) actually eat. So instead of buying some chocolate chips for a recipe, I decided to 'make' some out of the chocolate bunnies and add them to a recipe. 

As I used his chocolates, I thought I really ought to make treats that he would enjoy too - so gone was the quinoa flour (too much of a taste for him) and bring on the sweetness with almond flour. Also I did not want to make big cakes, as he finds it hard to finish them - madeleines are the perfect size for him. He loves them, Mr MiH loves them, and I ate four of them as soon as they were out of the oven - so we can safely say that I love them too (maybe a bit too much). 


The recipe has been adapted from this one - it is now gluten free and using one of my favourite baking ingredient, coconut oil. 

So what will you need (for 24 madeleines, 4 points on WW)
  • Nonstick cooking spray
  • 2 large eggs
  • 170 g milk chocolate
  • 80 g coconut palm sugar
  • 1/4 teaspoon vanilla extract
  • 75g rice flour
  • 75g almond flour
  • 1/4 teaspoon salt
  • 1/4 teaspoon baking powder
  • 110g coconut oil


How to make them?

I have two 8-mould madeleine pans (thanks Mum) but you could use mini- or regular-muffin pans

Preheat the oven to 180 C. Spray the madeleine pans with nonstick cooking spray and set aside.

In the bowl of a standing mixer fitted with the whisk attachment,cream together the eggs and coconut palm sugar on high speed until the mixture thickens and develops a light pale colour, 3 to 4 minutes.

Beat in the vanilla extract, rice and almond flours, salt and baking powder. Turn your mixer down to low speed and slowly pour in the melted coconut oil. Mix until everything is incorporated, but don't over mix. Add the chocolate chips.

Divide the batter evenly between the moulds in the prepared pans (not too much in each mould). Bake until lightly golden around the edges, about 8 minutes.

Let the madeleines cool for about 2 minutes in the pan, and then invert them onto a cooling rack to cool completely. 


You have to forget what madeleines taste like - these are quite different and have a really strong almond taste. They are not dry at all.  

About being gluten free (these contain chocolates - so they are probably not gluten-free), I have not gone totally gluten free, I have tried to swap half of my gluten intake - so pasta and bread are definitely on the menu!

Super(foods) double choc cookies :: Baking ::

Thursday, 26 March 2015


Even on a diet I am going to eat chocolate cookies, I am just rubbish at resisting food I should not eat. So I decided that I should make them as good as I can, and make them super(food) cookies. I was lucky that in her Superfoods cookbook, Rena Patten had a chocolate cookie recipe that I could rely on (I already used this book here). And I swapped the butter for coconut oil and the brown sugar for coconut sugar 

Coconut oil is definitely up there in the superfood list - coconut sugar probably not, although it is more natural than normal sugar, so a bit better but not much. 

However (as you will see with the WW point) superfood does not mean diet foodFor me, it is all about making the most of eating a treat, and not waste empty calories. The recipe I used in the end includes quinoa flour, raw cocoa powder, coconut oil and dark chocolate - I reckon I am making full use of superfoods. It happens to be really tasty too, so what more could I wish for! 


What you are going to need? (for 19 cookies, 5WW per cookie, aouch!)

  • 200 g quinoa flour
  • 1 tsp baking powder
  • 1/2 tsp bicarbonate of soda
  • 3 tbsp pure raw cocoa
  • 150 g of dark chocolate chips
  • 125g of coconut oil
  • 100 g of coconut sugar
  • 2 tsp of vanilla extract
  • 2 eggs
  • 2 tbsp of low-fat milk


1. Preheat the oven to 180 C and grease and line baking trays with non-stick baking paper.
2. Sift together the flour, baking powder, bicarbonate of soda and cacao then stir in the chocolate chips.
3. Add the coconut oil and sugar to the mixture.
4. Beat in the vanilla and eggs, then fold in the mixture. Add the milk and mix until well combined. The mixture will be soft and sticky. 
5. Make small balls from the mixture and place them on the baking trays. 
6. Bake for about 11-12 minutes. The cookies should not be overcooked and still be a little soft when taken out of the oven. 
7. Cool the cookies completely before removing them (if you can!)


I know it is a lot of points on the WW diet - but to be fair these are decent size cookies. I could probably have made them smaller for less points, but what is the point in having a small cookie? 

So here is my way to make the most of my chocolate addiction. 

Amaranth, ama-what? :: Baking ::

Saturday, 7 February 2015


Detox is my word for 2015 - and in addition to start my diet, I wanted to find out more about superfoods... And apparently amaranth. I had no idea this little grain existed. But I was missing out, this grain is the real deal in terms of health benefits. Finding out about it was one thing; doing something that would taste nice with it another. I had the help of this great book and ta da  we now have super dooper biscuits. And to be honest with a baby and a toddler, and Mr MiH training for a half marathon, I need all the superfood recipe I can get my hands on!


Just a little warning, these are a tad ginger-y for me, Mr MiH is a big fan of ginger biscuits, and loves them just like that. So you may want to tweak the recipe accordingly. Also I had to adapt the recipe to the content of my cupboards. 

What will you need to make 20 biscuits (3 WW points/biscuit)

60g of low fat butter
60g of coconut oil
15g of light brown sugar
55g of caster sugar
1 egg
1 tsp of vanilla extract
100g of quinoa flour
1 tsp of gluten-free baking powder
125g of dried dates
60g of stem ginger
100g of amaranth (popped following this post)
1 tbsp of lemon juice

How to make these? 

1. Preheat the oven to 180 C and line two large baking trays with non-stick baking paper
2. Cream the butter and coconut oil with the brown and caster sugar until light and creamy, then mix in the egg and vanilla. 
3. Sift the quinoa flour and baking powder and fold into the creamed butter mixture. 
4. Using a spatula, mix in the dates, ginger, amaranth puffs and the lemon juice. The mixture may seem a little dry but don't be tempted to add more liquid just press together as you are mixing so that it holds. 
5. Place spoonfuls of the mixture onto to the prepared trays and bake for 10-12 minutes until golden. 

Leave to cool slightly in trays before transferring to a cooling rack to cool completely. 


Here you are gluten free, low GI biscuits, these are good for you! Expect more superfood recipe on the blog, and guess what raw cocoa is a superfood, so I don't have to stop posting about chocolate! Whoohoo! 

Our Advent Calendar | Christmas 2014

Friday, 21 November 2014


Making our advent calendar with Baby MiH and Mr MiH was a lot of fun - it may have involved eating raw pastry and smarties, but that is why I prefer baking than playing with play-do. 

It is a bit early to make an advent calendar - especially one involving biscuits (they need to last for a bit of time) but as I was not sure whether I would have time to make it for the first of December I decided that last weekend was as good as any - and I could make fresher biscuits in between and these could be decorative.


I probably got out all the cookie cutters I have in my possession to make the cutting interesting, but also the advent calendar a bit more special. As you can see from the icing - this is very much homemade. Baby MiH was involved in the cutting but not in the icing - I am not really good at it, so with a toddler I dread to think what we would have ended up with. 

I used a new cookie recipe for these biscuits - from this book. It is an ok-ish book but it does have an interesting section on baking with children. I think it is the third time we baked with Baby MiH - and actually the first time with a pastry that does not stick everywhere, and got him interested for a whole hour! So it is probably worth using pastries like this with toddlers. 

The recipe is for classic honey cookies - these are super sweet (Baby MiH cannot get enough of them, we are a bit less keen, but they do smell wonderful!). You need to make the pastry beforehand - so just be aware of it, if you have mentioned to one little toddler that he will be baking soon... 

You will need (this makes a lot of pastry - way enough for the advent calendar and more; I followed the proportions because I wanted thick ones and I was worried I needed spares for the calendar because of icing accidents - but I think you can reduce the amounts by a third):

- 1 jar of clear honey (450g)
- 225g of light brown cane sugar 
- 225g butter
- 10g of baking powder
- 2 tbsp of rosewater
- 1 kg of flour
- 2 tsp of ground cinnamon, 1tsp ground ginger, and 1tsp ground cloves


How to make the pastry:

Bring the honey, sugar and butter to the boil, stirring constantly, and leave to cool. Dissolve the baking powder in the rosewater, stir the wet ingredients into the tepid honey mixture and add half of the flour, mixed with the spices. Mix well and gradually add the remaining flour. Knead the dough, put it in a plastic bag, and rest in a cool place for 24 hours (I left it for an afternoon in my garage...). 

Roll out the dough to the thickness you want, cut into pieces and bake at 200 C for 15-18 minutes. 

Let them cool down. And then get on with the icing, once the toddler has gone to bed. I used some already made icing (this one in red and white)- so much easier to handle. 


I know this is not perfect, but the fact that we all contributed to make our advent calendar is pretty cool (although I am not saying it is less expensive than one off the shelf). Also it did allow me to keep with the theme I have in mind for this Christmas. I am just wondering now how I am going to display it. It is one thing to display them neatly on my vintage trunk and another to make a Christmas garland out of them... 

What is your take on advent calendars this year? And do you have kids pastry recipes you would recommend?

Matcha Shortbread | A recipe {Baking}

Friday, 26 September 2014


I feel like I have not baked for a long time. I am cooking every day for us, but not actually baking. For once, I decided to make treats for the adults (basically that are not animal shaped) - so for Mr MiH and I to enjoy when Baby MiH goes to bed. As I am starting to be grazing rather than eating, little treats were appropriate, and I have been trying matcha green tea powder for the last couple of weeks, and was wondering how I could incorporate it into my baking. 


I came across this picture and I knew I needed to make those shortbreads, 


I followed this recipe exactly but not the steps. 
Makes about 30 shortbread

  • 185g (6½oz / 1¼ cups) plain (all-purpose) flour, sifted
  • 125g (4½oz / 1¼ sticks) unsalted butter, cut into cubes, at room temperature
  • 60g (2oz / ¼ cup) caster (superfine) sugar
  • 7g (1 tsp) matcha (green tea powder), plus extra for dusting
  • 500g (1lb 2oz) dark (bittersweet) chocolate, to coat

Preheat the oven to 160C (325F / Gas 3). Put all the ingredients, except the tempered chocolate, into a bowl and mix until the ingredients come together in a dough.
Remove from the bowl. Leave to rest for at least 1 hour in the fridge. Roll the dough to 5mm (¼ inch) thick on a lightly floured surface. Cut into 4cm (1½ inch) squares and transfer to a baking tray (sheet) lined with a non-stick baking mat. 
Bake in the preheated oven for 20–25 minutes until lightly golden. Remove from the baking tray (sheet) and leave to cool. Coat with melted dark chocolate and dust with matcha powder.


So they do not look as good as on the picture, but they do not look bad - and still they certainly qualify as grown-up treats. To be honest the matcha powder does not add that much to the taste - but adds great colouring! I may make a version with an orange twang in it, I think it would work really well with the dark chocolate. 

They are really quick to make - except for the chocolate coating - and do not require any special ingredients, but would make really cute presents for Christmas... Here is a thought. 

As always let me know if you make this recipe, and what you thought, 

The finishing the fruits tart | A recipe {Baking}

Monday, 25 August 2014

Happy Summer bank holiday (for those in England and Wales)! It is raining here, so today I am going to show you a recipe (which is written more like guidelines really) that I used whilst on holiday. Nothing like remembering sunshine when it is grey outside. 

We were given a lot of fruits when we were on holiday, which is great of course, but at the same time there are so many fruits two adults and a toddler can eat in the space of 5 days right, especially if these are already on the ripe side. So this 'recipe' was a way to avoid having to waste food and make something yummy with them. 


I have already made two versions of this tart. One on holiday (the red tart version) and a version at home only with apples (the yellow-ish version). And both were a hit. 

Not only was I lucky enough to have enough fruits given to us but also there was a ready-made roll of puff pastry, so I had everything. 


So you will need: 
  • enough fruits to make a compote (in the red version I used cherries, plums and apples, in the yellow version only apples)
  • keep enough fruits looking their best for the top of the tart (happens to be a couple of apples in both instances)
  • salted butter (I like the real French version using sel de guerande that you can find in the UK too, but it should work with normal salted butter)
  • vanilla extract
  • sugar
  • double cream
  • roll of ready-made pastry

You need to make a compote first (I tend to make it a bit in advance until I have time to make the tart). The way I make it is put all the fruits in the saucepan, with a little bit of water, and some vanilla extract - and leave it to cook. 

You then need to add sugar to taste as well as salted butter (about 10/15g I would say). You have to try the compote as you go long to know whether you like it or not. 


For the tart, blind bake the puff pastry your usual way. Once it is out of the oven, add the compote and the fruits (sliced) you kept on the side. 

But what really makes this tart, is the sort of glazing I add on top (it is adapted from a Brittany recipe called 'caramel sale'). It is made with 25g of sugar, 40g salted butter, and 5cl of double cream. In a pan, melt the sugar at low heat, and add preheated double cream. Then add the butter and stir quickly to make a creamy mixture. Pour over the tart. And in the oven until you see the fruits on top going brown (about 20 minutes at 180 C). 

Et voila! I must admit this is clearly a pregnant thing for me - it totally fixes any sugar craving I may have. I cannot eat a lot of it in one go, which is probably a good thing too. However Mr MiH loves it too, and so did everyone who has tasted it - so maybe not just a pregnant thing after all. Let me know if you get to try it! 

Red and White Gooseberries Clafoutis | Recipe {Baking}

Thursday, 17 July 2014

Last Sunday we went out with Baby MiH to our nearest Pick Your Own farm (you can see some pictures in the post) - literally 5 minutes down the road (for those in Hertfordshire, the St Albans Hawkswick Lodge Farm). Mr MiH was not convinced but I nagged - and Baby MiH loved it. He had enough after an hour, but by then I had picked more fruits that the three of us could eat. 


Earlier that week, I had filed a gooseberry recipe found on Moral Fibres - and it reminded me of the clafoutis my Grandma used to bake, so I had to try it. My Grandma used cherries usually, as to be honest I had not seen a lot of gooseberries where I came from in France (I did not know, but they are called groseilles a maquereau). At the farm we found white ones as well as red ones (that are much sweeter) - a great discovery. And as nearly everyone seemed to avoid the gooseberries bushes, it was pretty easy to pick them. 

Baby MiH getting close to some gooseberry action
So I had to bake the recipe as soon as we were back home, and Mr MiH keeps raving about it - honestly I am sure he has eaten 3/4 of it on his own, because the great thing with clafoutis is that it gets better and better as it cools down. 

He is adamant he was to hold his own basket
As I mentioned this is not my recipe, but I copied and pasted it so it is easy for you to refer to it. 
  • 400g gooseberries (I mixed equally white and red ones)
  • 30g butter (plus extra to grease your baking dish)
  • 2 eggs
  • 150ml milk
  • 90g granulated sugar
  • 90g flour
  • 2 tablespoons of icing sugar
  • 1.5 teaspoons of vanilla extract
Our little beefeater
We were too slow for him
Preheat your oven to 180°C/gas mark four.
Cut the tops and stalks off of your gooseberries, and give them a good wash.
Butter a roughly 20cm pie dish or baking tin and then lightly sprinkle with a little bit of icing sugar.  Place your gooseberries in the dish.
Beat your eggs and sugar together until creamy.  Then add your flour (sifted), vanilla essence and milk and mix well until combined.
Melt your butter in a small pan and add to the mix, stirring well.
Pour the batter over the gooseberries, and place your pan in the oven for around 35 minutes, or until your clafoutis is puffed and golden brown and a skewer or knife comes out clean. 

An hour worth of pick your own
So you get a great activity and yummy food out of it! A total win-win as far as I am concerned. 


Baby MiH is very much into outdoors activities, any activity close to nature that you can recommend doing with a toddler? I sent the boys to the farm on Tuesday to feed the goats and the alpacas, and ride the tractor - another great hit... 

For the many cups of tea to come | Recipe {Baking}

Monday, 16 June 2014

Mr MiH is leaving... It is his turn to go travelling on business - for FOUR days, i.e. THREE nights. On the one hand this means no world cup matches on TV, whoohoo! On the other, the logistics of looking after Baby MiH on my own needs precise organisation, and nothing can go wrong (ie no train delays, meetings over-running). Luckily, my Mum is coming to help out - and I baked some biscuits for when Baby MiH has (finally) gone to bed to keep our energy levels up. The recipe is again from My Granny's Baking Book by Catherine Best. I adapted the recipe - Shrewsbury cake - slightly (all changes in bold in the recipe). 


The biscuits - not sure there are cakes - are so simple, but with a hint of lemon and vanilla, they are really different from your usual shortbread biscuits and delicious with a cup of tea (just the right texture to be dunked). Also, they happen to require little ingredients, and these are quite basic so probably already in your cupboard. 


I made 25 cakes with the recipe - that number depends on the thickness of the biscuits. 

You will need:
- 115g soft butter
- 140 g caster (superfine) sugar
- 2 egg yolks
- 225 g of plain flour
- finely grated ring of 1 lemon
- juice of 1 lemon
- 1 teaspoon of vanilla extract


How to make these:

  1.  Preheat the oven to 180 C. Line baking sheets with baking parchment.
  2. In a mixing bowl, beat the softened butter with the sugar until pale, light and fluffy.
  3. Add the egg yolks to the butter and sugar mixture, one at a time, beating thoroughly after each addition.
  4. Sift the flour over the top and add the lemon rind. Stir in. 
  5. Add the lemon juice and vanilla extract. 
  6. Gather up the mixture to make a stiff dough (you may need to add a bit flour to take into account the addition of lemon juice and vanilla extract). 
  7. Knead the dough lightly on a floured surface then roll it our to about a 5mm thick.
  8. Using a cookie cutter, cut out circles.
  9. Arrange the cookies on the baking sheets - and flatten each with your fingers. 
  10. Gather up the offcuts and roll out again to make more biscuits.
  11. Put into the hot oven and cook for about 15 minutes, until firm to the touch and lightly browned. 
  12. Transfer to a wire rack and leave to crisp up and cool completely. 
  13. Enjoy!


Nothing fancy, but just some comfort eating biscuits. Sometimes it is the best thing to have in the house witha cup of tea, and hopefully get on with some of my projects! 

Gone bananas {Recipe}

Monday, 19 May 2014

Sunday is cake day at ours - not on purpose, it just always seem to happen on a Sunday. And this Sunday I had a few bananas to get rid of. Baby MiH and I have a thing for bananas but it seemed that I was over-enthusiastic on my last food shopping day and got a few too many. 

It was also an opportunity to test some recipes from the latest cooking book I took out of the library - My Granny's Baking Book - great book, many pictures and everything looks yummy. And there was a banana bread recipe, bingo! I have never tried banana bread - I know, shocking. So I am not sure how this compares, but Baby MiH and I loved it. 


However Mr MiH is not the biggest fan.. I was surprised because he does not have as sweet a tooth as Baby MiH and I have - and this cake/bread has no sugar (I added the icing sugar on top specifically for that reason). This cake is probably healthier alternative to his usual tea on Sundays.


I have changed the recipe slightly so that I could use what I actually had in the house - this is how I made mine. 

You will need: 
  • 115g of unsalted butter
  • 1 tsp bicarbonate of soda
  • 220g of flour
  • 2 tsp of mixed all spices
  • 25g of wheat bran
  • 2 eggs beaten 
  • 3 very ripe bananas
  • 2-3 tbsp milk
  • icing sugar for dusting


So how to make it

1. Preheat the oven to 180 C. Grease and base line a loaf tin. Cream the butter in a bowl until it is fluffy. Sift the bicarbonate of soda with the flour and spices, then add to the creamed butter, alternately with the eggs. Add the bran. 
2. Peel the bananas and slice them into a bowl. Mash them well, then stir them into the cake mixture. Add enough milk to give a dropping consistency. 
3. Spoon the mixture into the loaf tin and level the surface. Bake for 75 minutes or until a skewer inserted in the centre comes out clean. Cool on a wire rack. 
4. Sift the icing sugar - if you want...


A new Sunday cake for this week - and look at that (dirty) little  face, I will just have to bake more cake to see that face again.


Hope you had a great weekend, as you can see from the pictures, we had wonderful weather and made the most of it!

Cute and Quick | Chocolate Muffins {Recipe}

Sunday, 4 May 2014

I am actually posting a recipe with proper pictures, whoohoo! These are sure signs that I am back into blogging. And then there is homemade cake in the house - feels like life is (nearly) normal again. 

Today's new recipe is nothing fancy BUT this the first recipe I made with Baby MiH. Let's face he was not totally involved in the process, no little fingers messing around with chocolate - no one is allowed to mess with chocolate. He was testing the ingredients from his high chair, and repeating some of the words I was saying as we went along. And this can only mean one thing - yes, this is a very quick recipe - attention span of a 16-months-old baby: 10 minutes max if there is entertainment (and food). 


Before I give you the recipe, there are a couple of things you need to know. I made this recipe 3 times now, but in different shapes (loaf cake, madeleine and cupcakes). Cupcakes are the best way to serve this. Which leads me to the next thing, if you are going to serve this to friends, make sure you have a spoon handy for them because it does not hold really together - it is really light and yummy but is messy - although in a cupcake form it is MUCH better than in the cake loaf one (that was a disaster). 


This is a French WW recipe (although they did not add the chocolate napping on top - so you have to add this for your points).  

You are going to need (for 10 muffins, 5 ProPoints each):

  • 1 egg 
  • 90 g caster sugar  
  • 1 pot of very low fat natural yoghurt
  • 100 g flour 
  • 11 g of baking powder
  • 100g chocolate (dark, milk or white)
  • 9 tsp Oil
And how to make them

1.Preheat oven to 180°C (gas mark 6). In a bowl, mix the egg and sugar until the mixture whitens. Add yogurt and flour and baking powder. Add oil to smooth the mixture.

2. Melt chocolate in microwave with 2 tablespoons of water (leave for 2 minutes at 750W). Pour into your main preparation, mix well.

3.Divide the mixture into a cupcake baking dish lines with cases - bake for 25 minutes.


4. (optional) Melt more chocolate as in step 2 and pour on cupcakes.


Yes, it is that easy. Nothing fancy but little cakes that my boys love - and so do I! All I need now is a cup of tea.. Who's putting the kettle on?


Happy Sunday everyone!

A Proper Tarte au Citron | Recipe {Baking}

Sunday, 16 February 2014

When he was younger, my brother would only eat lemon tart as a desert. That was the best thing in the world as far as he was concerned, as long as they were lemoney, and not a version of custard with lemon zest. My brother is super picky, but I am sure this recipe would meet his approval.

I could say that I have worked on this recipe forever - but I have not... and the only reason why I made a Lemon Tart is that I had some ready-made pastry and lemons, and thought I would have a go.


There are a couple of things I should mention. This is not a sweet version of the lemon tart - if that is what you prefer, you may need to adjust some of the ingredients (e.g. the pastry and the number of lemons used).  It is best to prepare it the night before leave it in the fridge overnight - it may be hard but it is worth it.


So this is how I made it...

Ingredients:
  • 4 lemons (3 small and one big - this is what I had) - juiced
  • The lemon zest of one lemon
  • 1 ready-made shortcrust pastry (I bought this French one)
  • 3 eggs
  • 130 g fine caster sugar
  • 100 g of butter
  • 2 tbsp of half fat creme fraiche
(optional meringue)
  • 3 egg whites
  • 175 g icing sugar


1. Preheat the oven to 180C
2. Bake the pastry blind for 15 minutes in the preheated oven until pale golden-brown. Remove from the oven and remove the baking beans and paper. Carefully trim the excess pastry off around the sides using a sharp knife. Return the empty pastry shell to the oven for another 10-12 minutes or until it is completely dry. Set aside to cool.
3.  Put the butter and sugar into a pan with the juice and zest and place the pan over a medium heat. Stir continuously for 10-15 minutes (do not allow to simmer) until the butter has melted and the sugar has dissolved. Increase the heat to medium-high and stir until it begins to simmer, and remove from the heat.
4. Beat the three eggs to pale on the side.
5. Add the eggs to the lemon mixture, and place the pan over a low heat. Stir until it thickens, add the creme fraiche. Stir until it begins to simmer. Remove from the heat.
6. Pour the lemon filling into the centre of the pastry case allowing the lemon curd to flow evenly to the edges. 
7.  Put back in the oven for another 10 minutes, take it out and leave it to cool
8. Make the meringue topping
9. Spread the meringue topping on the lemon tart, and put it under the grill until it gets golden.
10. And it goes in the fridge..


Here it is, one of my new favourite recipe. It is much less complicated that what it may sound, and totally worth the effort! As always let me know if you have used the recipe and what you think!